PubSub to BigQuery: How to Build a Data Pipeline Using Dataflow, Apache Beam, and Java
I’ve recently worked on a project that required me to collect data from Google PubSub and load it into different BigQuery tables. I’ve faced many challenges during this process so I would like to share my experience building a complete data pipeline in Google Cloud Platform.
Problem statement
Let’s say we have a library application that sends various events from its backend to PubSub in our project in GCP. An event is any user iteration with the application. For demonstration we want to gather the following events:
- detailed_view, when a user opens a page with book details
- search, when a user searches for a book
- add_to_favorite, when a user adds some book as a favorite
Each event type has a different structure and should be saved to a separate table in BigQuery for further analysis. We get events in JSON format and event_type parameter inside JSON defines the table where this event needs to be written in.
detailed_view event example:
{"event_type": "detailed_view",
"time": "2021-08-01",
"visitor_id": "bdd6a03a-390a-4e76-b098-b74ea385228e",
"book": {"id": "1231234"}
}
search event example:
{"event_type": "search",
"time": "2021-08-01",
"visitor_id": "bdd6a03a-390a-4e76-b098-b74ea385228e",
"search_query": "War and Peace"
}
add_to_favorite event example:
{"event_type": "add_to_favorite",
"time": "2021-08-01",
"visitor_id": "bdd6a03a-390a-4e76-b098-b74ea385228e",
"book": {"id": "1231234"},
"rating": 5
}

Thus, you can see that the black box will do all the magic for us and we don’t have to do anything.
Just kidding, I wish it could be so easy.
You may say, ok, great, but what if data suddenly came up with a different structure or in a broken JSON? We all know that the life of data engineers is full of pain and continuously changing data structures. What if someone has changed the schema from the backend without any notice? How can we recognize if it happened? How do we keep and save such data without stopping the pipeline till some fix is applied?
Thus, we need a solution that can parallel output data streams into the different data storages depending on a specific condition and also be able to collect rows that can not get into BigQuery for some reason. So the solution is Dataflow, a fully managed data processing service from Google based on Apache Beam. It provides all required functionality alongside a serverless approach and horizontal scalability. You can read Apache Beam documentation for more details.
I would like to mention three essential concepts about it:
It’s an open-source model used to create batching and streaming data-parallel processing pipelines that can be executed on different runners like Dataflow or Apache Spark.
Apache Beam mainly consists of PCollections and PTransforms. A PCollection is an unordered, distributed and immutable data set. PTransforms are the operations on PCollections as stages of a data pipeline. Apache Beam allows to branch the data processing both for inputs and outputs of PTransforms.
A PCollection may be bounded—data set of fixed size or unbounded—data set of unlimited size. If you read data from PubSub, your PCollection is unbounded.
In the picture below you can take a look at the final pipeline architecture.
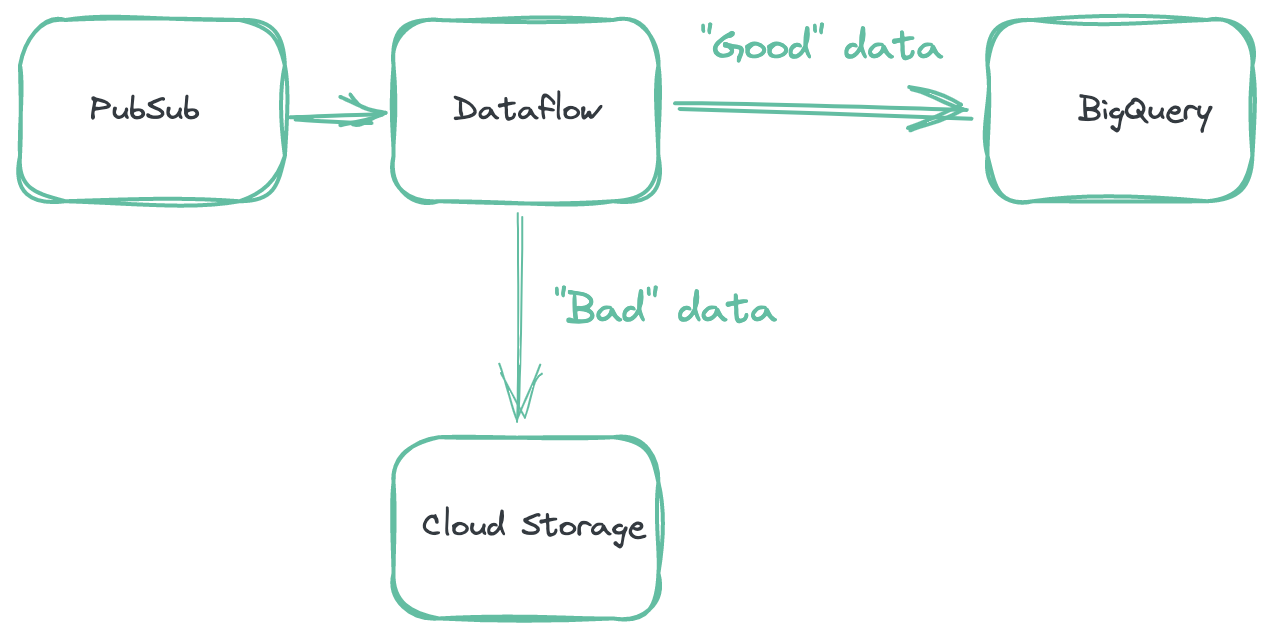
Now that we got an idea of our data pipeline it’s time to bring it to life. As you can see in the picture above we have a Dataflow job in the middle that involves the following steps:
Continuously reads JSON events from PubSub published by the backend of our application.
Processes JSON events in a PTransform.
Loads them to BigQuery. The destination differs based on event_type field in the JSON event.
Collects all rows that were failed to insert and uploads them to the Cloud Storage bucket.
Count all “good” data and “bad” data and presents them as metrics
Streaming or batch mode?
Before we ingest data into BigQuery we need to choose the right mode for us. Data can be loaded in batch mode as chunks of data or in streaming mode, which means smaller batches in real-time but at a higher price.
How to make a choice?
BigQuery uses load jobs to ingest data. For this process Google has quotas that are essential to consider when picking an ingestion method.
Your project can make up to 1,500 operations (like load, copy, query) per table per day including failed jobs per day for the destination table.
Your project can run up to 100,000 load jobs per day. Failed load jobs count toward this limit.
The total request payload must be less than 10MB.
Another important thing to consider is Apache Beam behavior with loads of unbounded data in batch mode into BigQuery. If such load fails, then Apache Beam will retry it 1000 times. You can see the proof from their source code itself:
 // When running in streaming (unbounded mode) we want to retry failed load jobs
 // indefinitely. Failing the bundle is expensive, so we set a fairly high limit on retries.
 if (IsBounded.UNBOUNDED.equals(input.isBounded())) {
 batchLoads.setMaxRetryJobs(1000);
 }
There is no parameter to change this default value so it means that if somehow you get two bad loads at least twice per day for the same table, you will overreach the load jobs quota:
1 * 1000 retries + 1 * 1000 retries = 2000 retries > 1500 quota
For the project level 100 incorrect loads total will exceed the quota.
In my opinion, if you use Dataflow with unbounded data (like PubSub) and your pipeline is highly loaded in production and uses numerous tables, then it’s safer to use streaming mode although more expensive. Otherwise, if you reach the jobs quota for the table, then all other jobs like query or copy for this table will be impossible for a day. If you come to the project’s jobs quota, all jobs for all tables will be stuck.
Certainly you can check all structures and types before ingesting the data but this also doesn’t guarantee safety for your pipeline.
So in this tutorial I’m going to show you how to load data in streaming mode.
Setting up your local machine
Apache Beam requires JDK (Java SE 8 (8u202 and earlier). Don’t forget to set JAVA_HOME environment variable.
All the code from this tutorial and even more can be found on my GitHub.
You can install IntelliJ but I’m going to use a command line for simplicity.
Setting up Google Cloud
1. Project
Create a project in Google Cloud Platform if you don’t have one. Link Billing Account with your project if it’s not linked.
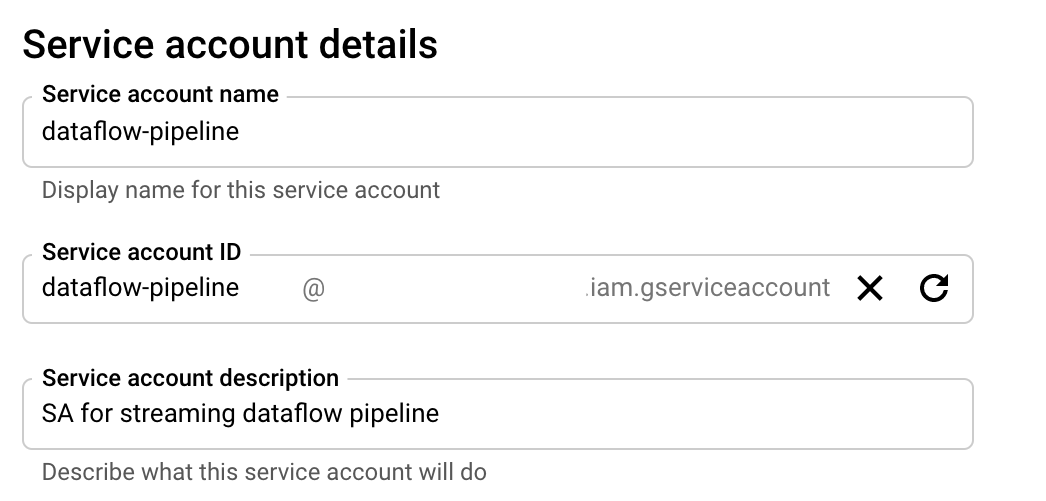
2. Service Account
In the Cloud Console go to the Service accounts page. Choose your project and click Create service account. Then you will be asked to provide details.
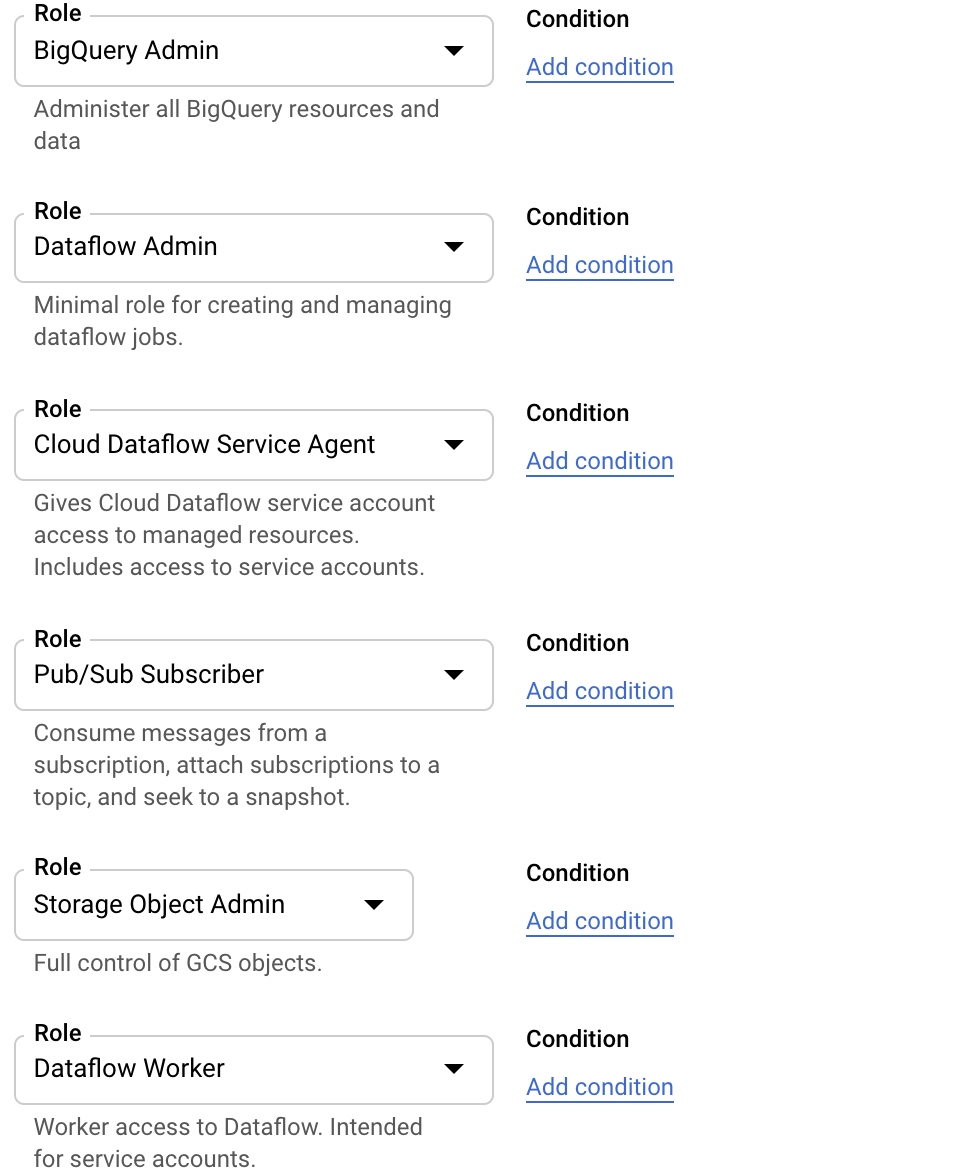
Grant this service account the following permissions that we require for our data pipeline:
- Cloud Dataflow Service Agent
- Dataflow Admin (for jobs creation)
- Dataflow Worker
- BigQuery Admin
- Pub/Sub Subscriber
- Storage Object Admin
I took Admin roles for simplicity but you can use more precise roles like BigQuery dataset-level access and Storage specific bucket access.
Then you should create and download the JSON key of your SA. On the Service Account page:
- click Keys tab
- click the Add key drop-down menu
- select Create a new key
- select JSON as the Key type
- click Create
Clicking Create downloads a service account key file in JSON format on your computer.
You can add a path to your SA key file to GOOGLE_APPLICATION_CREDENTIALS environment variable.
export GOOGLE_APPLICATION_CREDENTIALS=<path to sa file>
3. Dataflow API
In the Cloud Console enable Dataflow API
4. Private Google Access
Dataflow workers demand Private Google Access for the network in your region. Go to the page VPC Network and choose your network and your region, click Edit choose On for Private Google Access and then Save.

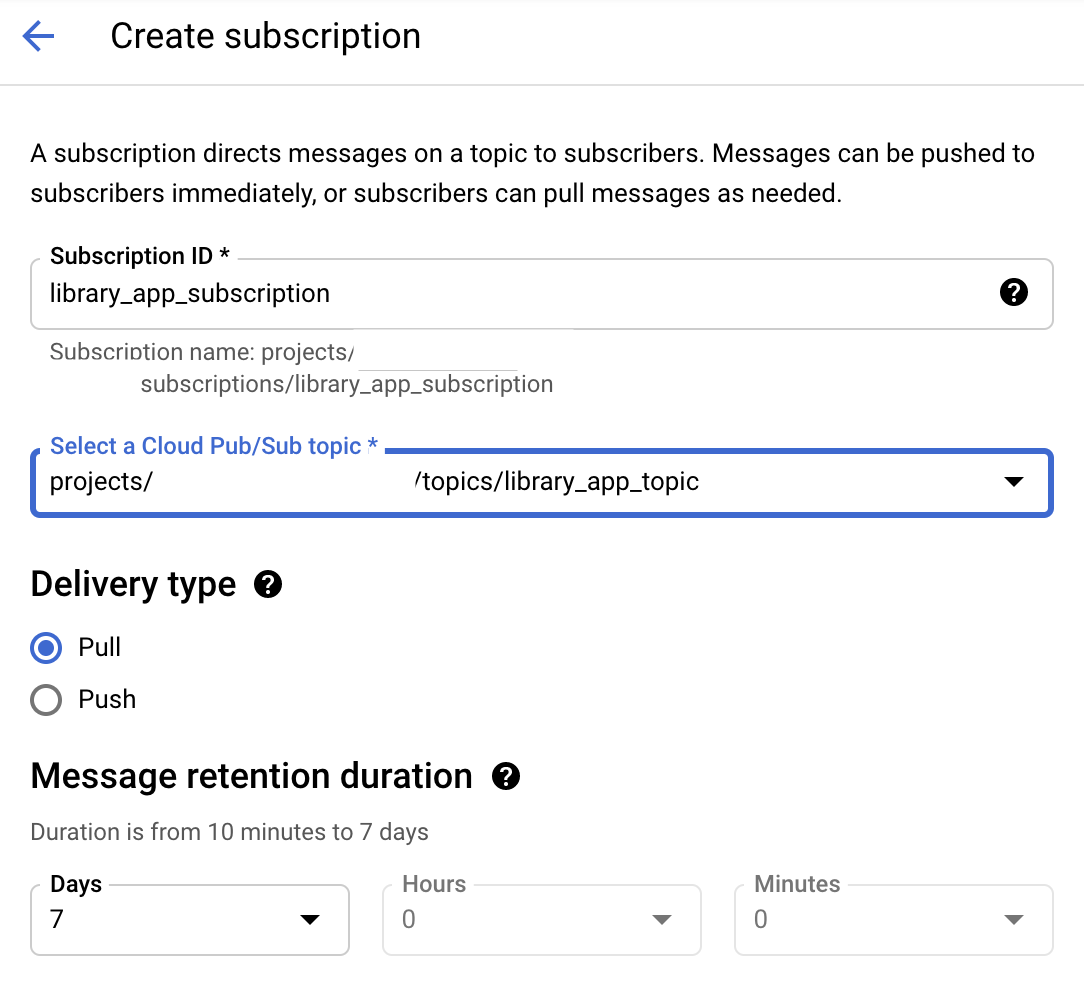
5. PubSub
Create a PubSub topic and a “pull” subscription: library_app_topic and library_app_subscription in our case.
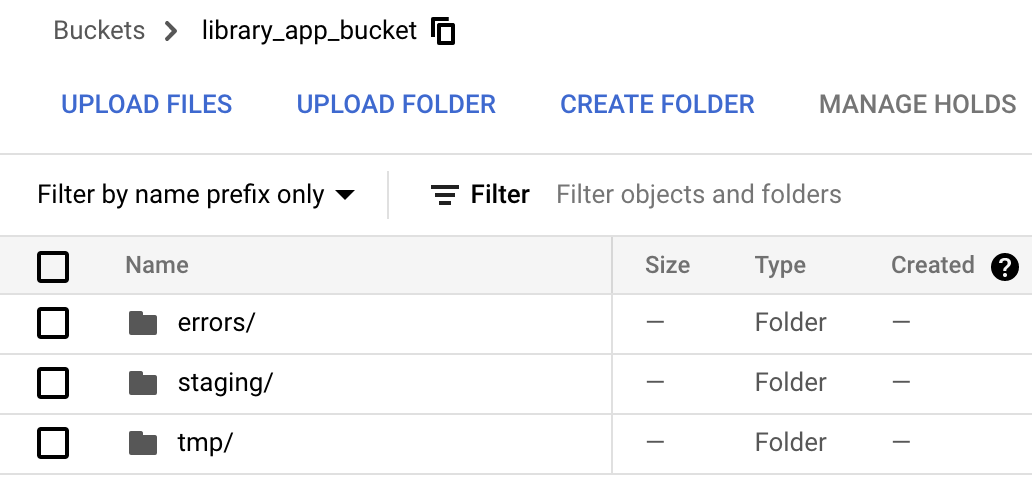
6. Cloud Storage
In the Cloud Console create library_app_bucket Cloud Storage bucket and another three inside it: tmp, staging and errors. Dataflow will use this bucket for deployment and for saving data not ingested in BQ.
7. BigQuery
I will show how to create detailed_view table so you can easily repeat the same process for other tables. In BigQuery create library_app_dataset in US location because we will run our Dataflow job in this location. Then from the dataset click Add table.
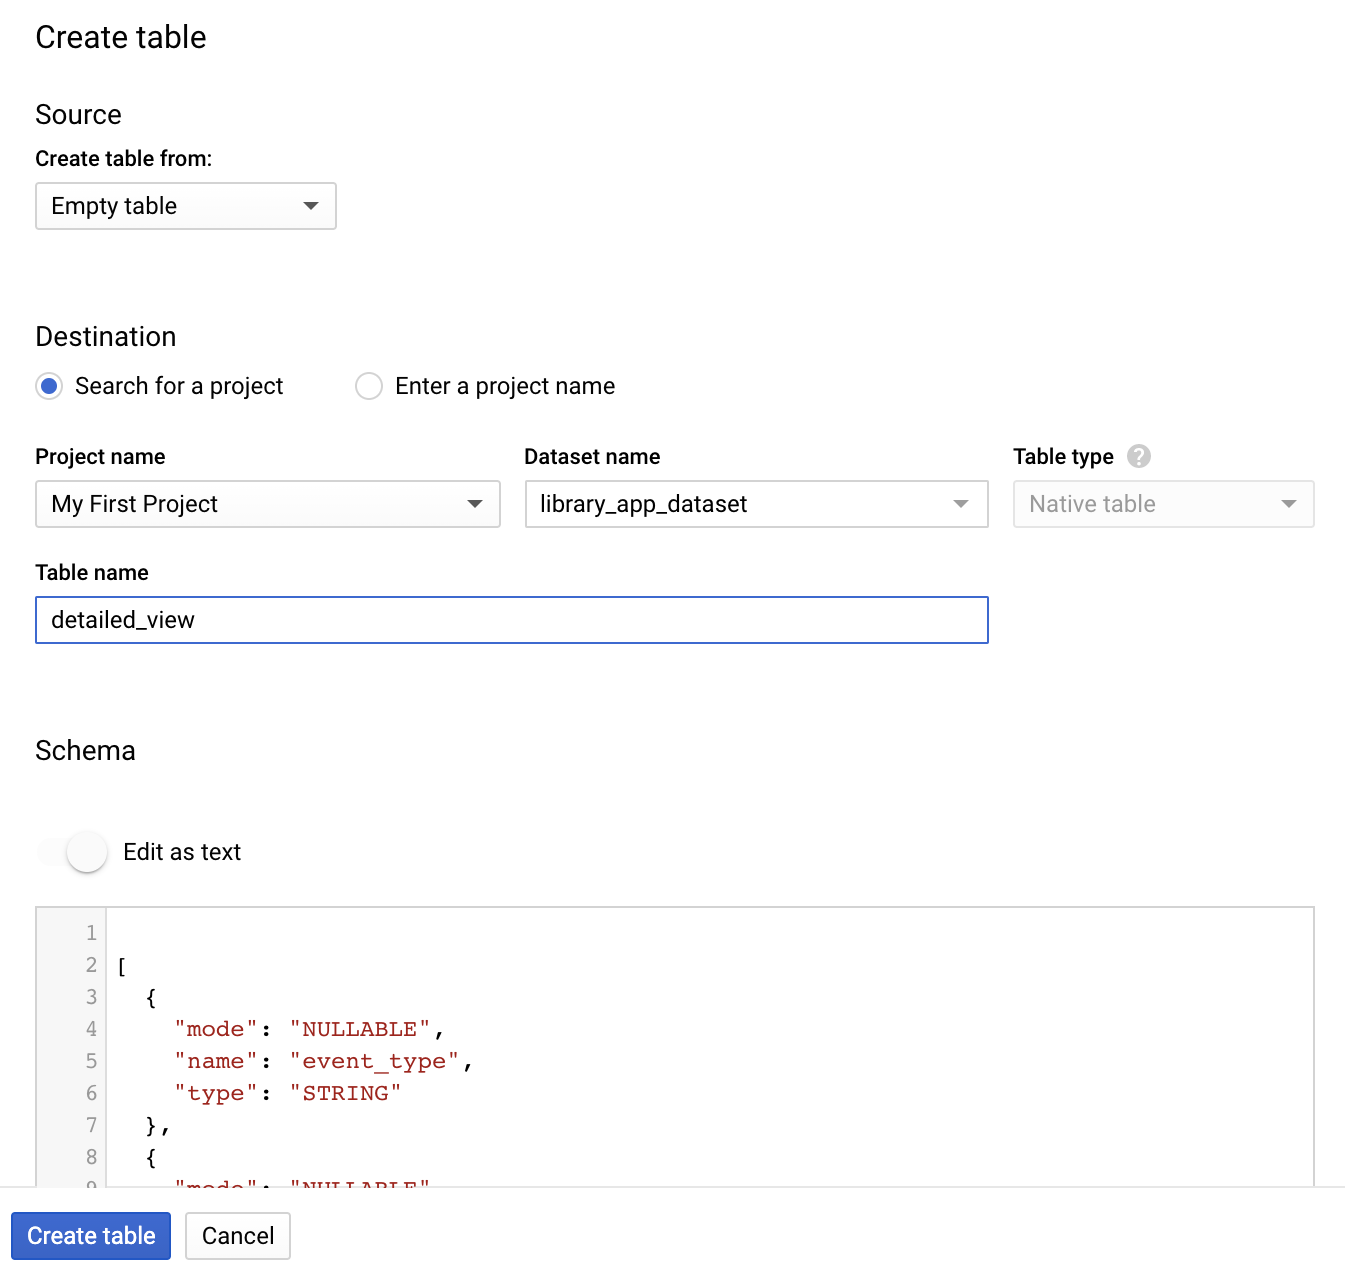
Choose source as an Empty table. In the Table Name field write detailed_view then click Edit as a text under Schema section. Insert this JSON below and click Create table button.
[
  {
    "mode": "NULLABLE",
    "name": "event_type",
    "type": "STRING"
  },
  {
    "mode": "NULLABLE",
    "name": "time",
    "type": "STRING"
  },
  {
    "mode": "NULLABLE",
    "name": "visitor_id",
    "type": "STRING"
  },
  {
      "fields": [
        {
          "mode": "NULLABLE",
          "name": "id",
          "type": "STRING"
        }
    ],
    "mode": "NULLABLE",
    "name": "book",
    "type": "RECORD"
  }
]
You can find all the schemas for all the tables in my GitHub repository.
Finally, after you repeat all steps for search and add_to_favorite tables you should see all of them under library_app_dataset dataset in BigQuery.
Let’s code
You can locate all the code on my GitHub. Just clone it and run ./gradlew build. Don’t forget to set GOOGLE_APPLICATION_CREDENTIALS environment variable with JSON key to your SA.
Here I will explain only the pipeline code.
First, we need to create a Pipeline object from Apache Beam that will contain all the data and steps of our data processing. To configure the data pipeline options you can create your own class (MyOptions in our case) that extends DataflowPipelineOptions and DirectOptions classes. You can use these options from the command line to set resources, for example, the PubSub subscription name and other parameters.
PipelineOptionsFactory.register(MyOptions.class);
MyOptions options = PipelineOptionsFactory.fromArgs(args)
                                          .withValidation()
                                          .as(MyOptions.class);
Pipeline p = Pipeline.create(options);
Then we read unbounded data from PubSub subscription. There is a class PubsubIO in Apache Beam that provides pre-written PTransforms for Cloud Pub/Sub streams.
PCollection<String> pubsubMessages = p
    .apply("ReadPubSubSubscription",
      PubsubIO.<String>readStrings()
        .fromSubscription(SUBSCRIPTION));
So we have the first step—ReadPubSubSubscription in the Dataflow pipeline.
Then we need to check if the JSON is correct: let’s write our custom PTransform and then use it in the pipeline code as TransformToBQ step.
We extend and override the PTransform class here with the function processElement with the help of ParDo and DoFn PTransforms from Apache Beam. This function takes a string with JSON and then produces the main output under SUCCESS_TAG and side output FAILURE_TAG.
SUCCESS_TAG includes messages that passed all checking and were successfully transformed to TableRow objects.
FAILURE_TAG represent a key-value variable where the key is a failure type:
- “TooBigRow,” JSON messages that are bigger than 10Mb (it’s a quota for payload size. We don’t want to be stuck with those messages)
- “JsonParseError,” JSON messages that caused all kinds of errors during JSON parsing
It’s possible to add more side-outputs and split IOException to more detailed exceptions.
public class TransformToBQ {

  private static final Logger log = LoggerFactory.getLogger(TransformToBQ.class);

  public static PTransform<PCollection<String>, PCollectionTuple> run() {
    return new TransformToBQ.JsonToTableRow();
  }

  static final TupleTag<TableRow> SUCCESS_TAG =
    new TupleTag<TableRow>(){};
  static final TupleTag<KV<String, String>> FAILURE_TAG =
    new TupleTag<KV<String, String>>(){};

  private static class JsonToTableRow
    extends PTransform<PCollection<String>, PCollectionTuple> {

    @Override
    public PCollectionTuple expand(PCollection<String> jsonStrings) {
      return jsonStrings
        .apply(ParDo.of(new DoFn<String, TableRow>() {
          @ProcessElement
          public void processElement(ProcessContext context) {
            String jsonString = context.element();

            byte[] message_in_bytes = jsonString.getBytes(StandardCharsets.UTF_8);

            // The total request payload must be less than 10MB
            // here we guess that request body is not more than 10MB, but
            // but also the size of the headers should be taken into account
            if (message_in_bytes.length >= 10 * 1024 * 1024) {
              log.error("Error: too big row of size {} bytes in type {}", message_in_bytes.length);
              context.output(FAILURE_TAG, KV.of("TooBigRow", jsonString));
            }
            TableRow row;
            // Parse the JSON into a {@link TableRow} object.
            try (InputStream inputStream = new ByteArrayInputStream(message_in_bytes))
            {
              row = TableRowJsonCoder.of().decode(inputStream, Context.OUTER);
              context.output(row);
            } catch (IOException e) {
              log.error("Error: {}", e.getMessage());
              context.output(FAILURE_TAG, KV.of("JsonParseError", jsonString));
            }
          }
        }).withOutputTags(SUCCESS_TAG, TupleTagList.of(FAILURE_TAG)));
    }
  }
}
PCollectionTuple results = pubsubMessages.apply("TransformToBQ", TransformToBQ.run());
Then we collect successfully processed data and stream it into BigQuery with the help of BigQueryIO class from Apache Beam, WriteSuccessfulRecordsToBQ step.
withMethod(BigQueryIO.Write.Method.STREAMING_INSERTS) defines streaming mode.
skipInvalidRows means if invalid rows exist in a bunch of data then skip them and don’t fail all the bunch. This works only in streaming mode.
During ingesting we get from the row a dynamic definition of the destination table from event_type field.
WriteResult writeResult = results.get(SUCCESS_TAG).apply("WriteSuccessfulRecordsToBQ", BigQueryIO.writeTableRows()
  .withMethod(BigQueryIO.Write.Method.STREAMING_INSERTS)
  .withFailedInsertRetryPolicy(InsertRetryPolicy.retryTransientErrors()) //Retry all failures except for known persistent errors.
  .withWriteDisposition(WRITE_APPEND)
  .withCreateDisposition(CREATE_NEVER)
  .withExtendedErrorInfo() //- getFailedInsertsWithErr
  .ignoreUnknownValues()
  .skipInvalidRows()
  .withoutValidation()
  .to((row) -> {
      String tableName = Objects.requireNonNull(row.getValue()).get("event_type").toString();
      return new TableDestination(String.format("%s:%s.%s", BQ_PROJECT, BQ_DATASET, tableName), "Some destination");
  })
);
withExtendedErrorInfo allows us to keep all failed inserts in a separate PCollection with error definition in MapFailedInserts step.
PCollection<KV<String, String>> failedInserts = writeResult.getFailedInsertsWithErr()
  .apply("MapFailedInserts", MapElements.via(new SimpleFunction<BigQueryInsertError, KV<String, String>>() {
    @Override
      public KV<String, String> apply(BigQueryInsertError input) {
        return KV.of("FailedInserts", input.getError().toString() + " for table" + input.getRow().get("table") + ", message: "+ input.getRow().toString());
      }
    }
));
In the code below we get all data from FAILURE_TAG PCollection and failedInserts and merge it to one PCollection. After Flatten we need to apply windowing and triggers to create a chunk of data of some time interval in Window Errors step and write it to the Cloud Storage bucket as one file in WriteErrorsToGCS step. Because in this case we don’t care about the order of data so we can use GlobalWindows.
PCollectionList<KV<String, String>> allErrors = PCollectionList.of(results.get(FAILURE_TAG)).and(failedInserts);

allErrors.apply(Flatten.<KV<String, String>>pCollections())
 .apply("Window Errors", Window.<KV<String, String>>into(new GlobalWindows())
   .triggering(Repeatedly
     .forever(AfterProcessingTime
     .pastFirstElementInPane()
     .plusDelayOf(Duration.standardMinutes(STORAGE_LOAD_INTERVAL)))
    )
   .withAllowedLateness(Duration.standardDays(1))
   .discardingFiredPanes())
 .apply("WriteErrorsToGCS", FileIO.<String, KV<String, String>>writeDynamic()
   .withDestinationCoder(StringUtf8Coder.of())
   .by(KV::getKey)
   .via(Contextful.fn(KV::getValue), TextIO.sink())
   .withNumShards(STORAGE_NUM_SHARDS)
   .to(ERRORS_BUCKET)
   .withNaming(ErrorFormatFileName::new));
And then just run the pipeline.
p.run();
Add metrics
As the result of the pipeline we have all “good” data in BigQuery and all “bad” data in the bucket. Let’s create some metrics. We will use the Counter metric class from Apache Beam.
import org.apache.beam.sdk.metrics.Counter;
import org.apache.beam.sdk.metrics.Metrics;

public final class Metric {

  public static Counter pubsubMessages = counter("pub-sub-messages");
  public static Counter successfulMessages = counter("successful-messages");
  public static Counter jsonParseErrorMessages = counter("json-parse-failed-messages");
  public static Counter tooBigMessages = counter("too-big-messages");
  public static Counter failedInsertMessages = counter("failed-insert-messages");
  static Counter counter(String name) {
      return Metrics.counter(Metric.class, name);
  }
}
So you can simply use inc() operation on each metrics in specific places and then see those metrics in the Dataflow job. For example, let’s count how many failed inserts we have in the pipeline. Take failedInserts PCollection and apply Metric.failedInsertMessages.inc(); for each of the elements in processElement. Therefore, failedInsertMessages contains the current number of failed inserts.
failedInserts.apply("LogFailedInserts", ParDo.of(new DoFn<KV<String, String>, Void>() {
  @ProcessElement
  public void processElement(ProcessContext c)  {
    LOG.error("{}: {}", c.element().getKey(), c.element().getValue());
    Metric.failedInsertMessages.inc();
  }
}));
Running the pipeline on a local machine
Once you set up the environment and GOOGLE_APPLICATION_CREDENTIALS variable and have your code you can run the pipeline first on your local machine with DirectRunner.
Go to the folder with gradlew file and first build the code
./gradlew build
Then run it with this command (don’t forget to write your project name instead of <project_name>):
./gradlew clean run -Pargs="--runner=DirectRunner \
--tempLocation=gs://library_app_bucket/tmp/ \
--stagingLocation=gs://library_app_bucket/staging/ \
--jobName=dataflow-libraryapp-job \
--project=pristine-dahlia-326810 \
--BQProject=pristine-dahlia-326810 \
--BQDataset=library_app_dataset \
--pubSubProject=pristine-dahlia-326810 \
--subscription=library_app_subscription \
--bucket=library_app_bucket \
--serviceAccount=dataflow-pipeline@pristine-dahlia-326810.iam.gserviceaccount.com \
--streaming=true"
If everything is fine, you will see the following lines in the command line:
<==========---> 80% EXECUTING [3m 15s]
> :app:run
As you can see the code was written to provide the possibility to have BigQuery, PubSub, and Dataflow in different GCP projects.
Running the pipeline on Dataflow
After checking our pipeline with DirectRunner we can run it in Dataflow with DataflowRunner. It’s almost the same command as in the previous paragraph but the runner parameter is DataflowRunner (don’t forget to write your project name instead of <project_name>).
Parameter enableStreamingEngine allows to use Streaming Engine. Dataflow’s Streaming Engine moves pipeline execution out of the worker VMs and into the Dataflow service backend, which means less consumed CPU and other resources.
During autoscaling Dataflow automatically chooses the appropriate number of worker instances required to run your job and parameter maxNumWorkers limits this number.
Parameter usePublicIps=false means that your Dataflow instance will not have public IP for security reasons.
./gradlew clean run -Pargs="--runner=DataflowRunner \
--tempLocation=gs://library_app_bucket/tmp/ \
--stagingLocation=gs://library_app_bucket/staging/ \
--region=us-central1 \
--enableStreamingEngine \
--numWorkers=1 \
--jobName=dataflow-libraryapp-job \
--usePublicIps=false \
--maxNumWorkers=1 \
--autoscalingAlgorithm=THROUGHPUT_BASED \
--project=<project_name> \
--BQProject=<project_name> \
--BQDataset=library_app_dataset \
--pubSubProject=<project_name> \
--subscription=library_app_subscription \
--bucket=library_app_bucket \
--serviceAccount=dataflow-pipeline@<project_name>.iam.gserviceaccount.com \
--streaming=true \
--workerMachineType=n1-standard-2"
It will time for Dataflow to deploy. In the end you will see the info on how to cancel the job.
17663 [main] INFO org.apache.beam.runners.dataflow.DataflowRunner - To cancel the job using the 'gcloud' tool, run:> gcloud dataflow jobs --project=<your_project> cancel --region=us-central1 2021-09-23_04_34_38-9136796642874199393
In the Cloud Console go to the Dataflow Jobs page and look at your Dataflow job. You should see a green circle near the name as a sign that the job is running successfully.
Don’t forget to cancel the job if you are not going to use it.
Test the pipeline and check metrics
Let’s publish to the PubSub topic some “good” data. Open the PubSub page in the Cloud Console, choose our topic and then click Publish message.
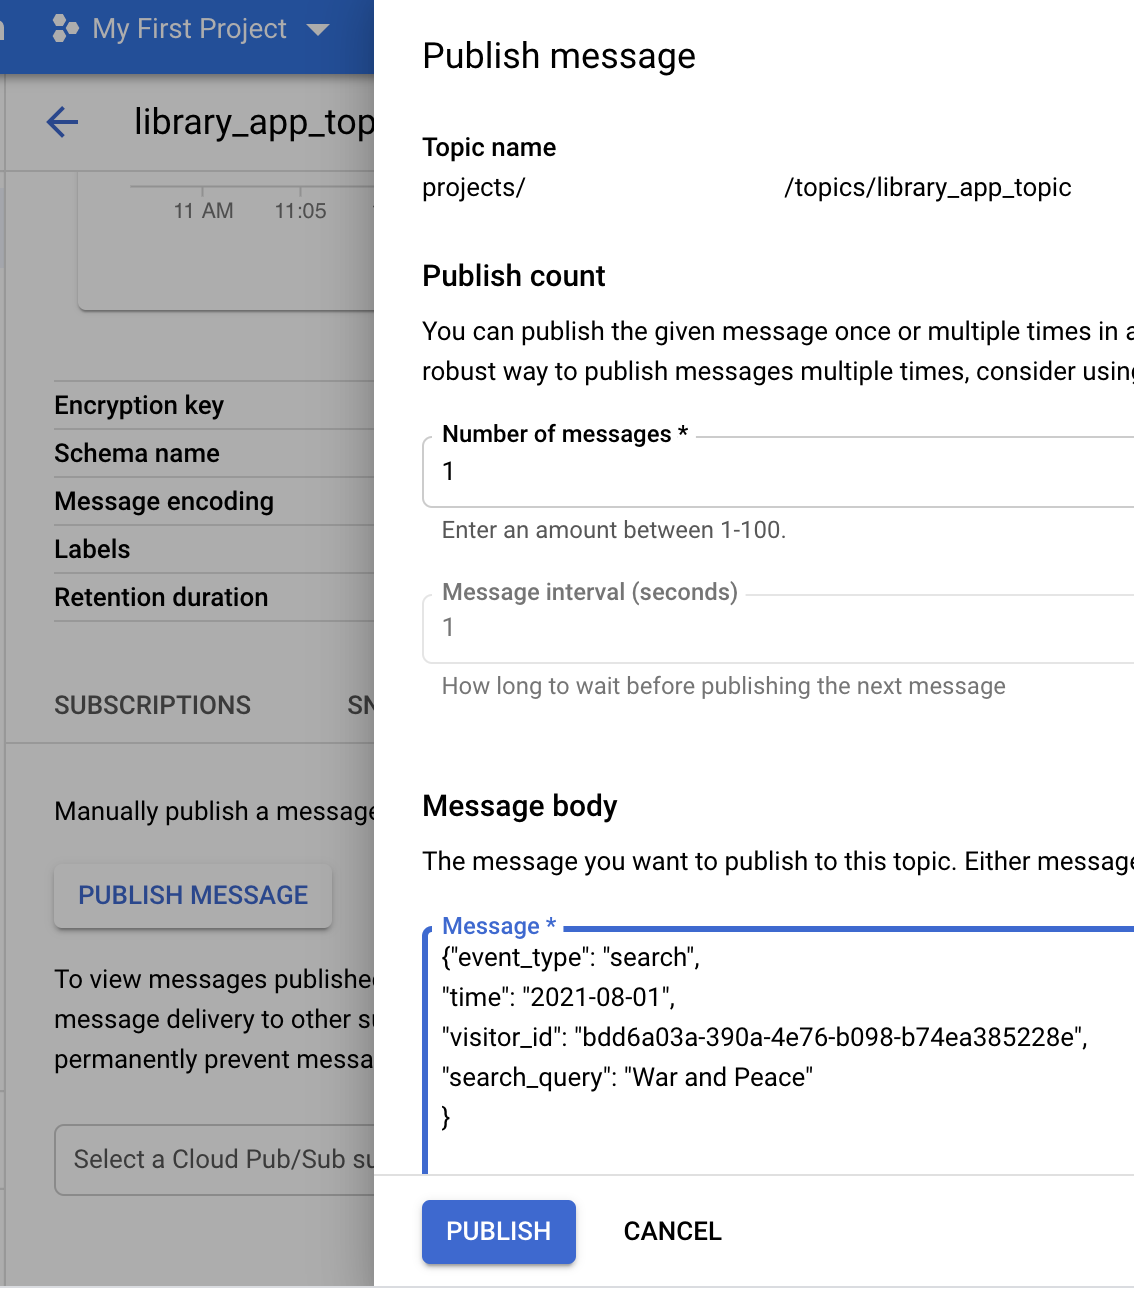
Insert this JSON below to the Message body section and click Publish button
{"event_type": "search",
"time": "2021-08-01",
"visitor_id": "bdd6a03a-390a-4e76-b098-b74ea385228e",
"search_query": "War and Peace"
}
Then go to the BigQuery page and check the data in the search table.
SELECT * FROM `library_app_dataset.search`
There is our “War and Peace” event in the query result.

You can try more test data from my GitHub.
Let’s check how our pipeline works with “bad” data.
Broken JSON
{"event_type":
 "add_to_favorite","time":
}
So this JSON is broken and it should appear in error bucket in one minute with a name in the next format:
library_app_bucket/errors/JsonParseError/2021-09-23/error-13:10:09-0-of-1
If you download this file, you will see that it contains our broken JSON
Wrong schema
Let’s take the add_to_favorite event, change the rating from a number to some string and push it to the topic.
{"event_type": "add_to_favorite",
"time": "2021-08-01",
"visitor_id": "bdd6a03a-390a-4e76-b098-b74ea385228e",
"book": {"id": "1231234"},
"rating": "this is a string"
}
So this JSON can’t be ingested to BQ because of type incompatibility and we will see it in our error bucket in a minute in this format:
library_app_bucket/errors/FailedInserts/2021-09-23/error-13:19:47-0-of-1
If you open the file, you can check that there is the same JSON as we pushed to the PubSub topic.
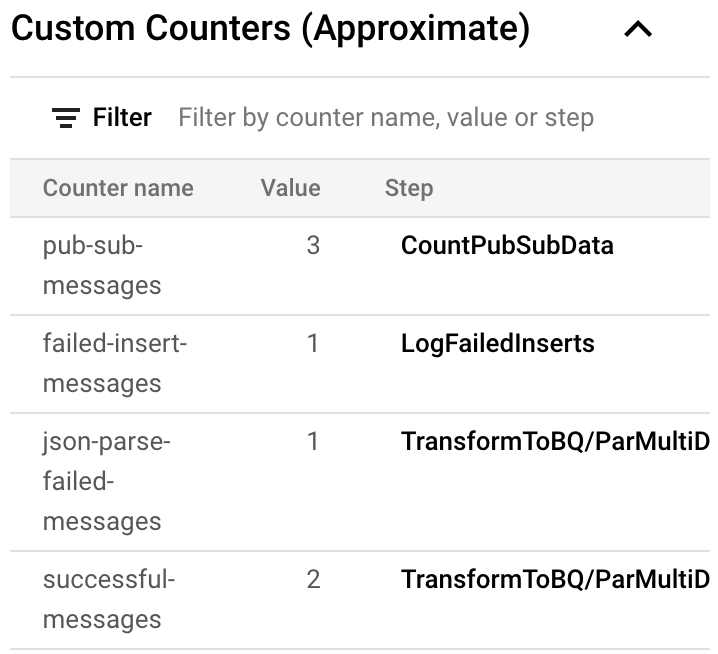
It is time to check our metrics
After running your pipeline in Dataflow and getting the first message in PubSub you can open your Dataflow Job page in the Google Cloud Console and see a new “Custom Counters” section right under Job Info. In the picture below you can see that we had three messages in PubSub and two of them were successfully processed but one of them failed during ingestion. And we see one message that was unable to parse.
Conclusion
To sum up, now that you know how to use Dataflow for typical ETL data pipelines you can also dive deeper into the Apache Beam world. We didn’t handle “bad” data much except saving it in this tutorial but adding some mechanism for further processing is possible. That’s it, thanks for reading. You can follow me on Medium and Twitter and LinkedIn.